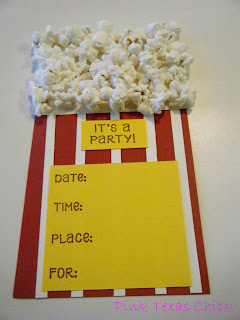
I made invitations with real popcorn on them!
I admit that I was a little nervous because I wanted my co-worker and her daughter to be pleased and I wasn't sure I would pull it off. The thought of using real popcorn popped (ha!) into my head as I was driving home. I quickly changed gears from nervous to excited and I must say they turned out quite groovy. These were really easy and quite fun to make and they were a hit with everyone.
Here is what I used to make this invitation.
Here is what I used to make this invitation.
- Red, white and yellow card stock
- Stamp set (this one is from Stampin' Up!)
- Elmer's All Purpose glue
- Paper punch for rounded corners
- Paper cutter
- Ink pad (I used Bravo Burgundy from Stampin' Up!)
- Adhesive either in glue dots (left) or adhesive tabs (right)
- All natural, white popcorn
Here is a rundown on how I made the popcorn invites.
- Cut red card stock to 4"x6" pieces
- Cut white card stock to 4"x5" pieces and several 1/4" strips
- Cut yellow card stock to 4"x4" and 2"x2" pieces
I then stamped all of the yellow pieces with the It's A Party and the Date, Time, Place, For stamps.
I rounded off the white 4"x5" card stock pieces so that I wouldn't have pointy corners behind the popcorn.
I used Elmer's All Purpose glue for the popcorn.
I then assembled the cards in this order:
- Used the glue dots on the white strips to put on the 4"x6" red card stock.
- Used the adhesive tabs for the yellow card stock.
- Used Elmer's glue on the back bottom portion of the popcorn card stock to adhere to the red card stock. You don't want to put glue all across the bottom because the sides of the popcorn will stick out OR you can put some glue on the red card stock and then stick the popcorn card stock.
- I glued the popcorn card stock about halfway down otherwise the entire invite would have been too top heavy.
Anywho, here is the final product. Not too bad, eh?
And here it is in a cellophane bag with some candy. The top of the bag was too short to be tied so it was folded back with a sticker. These invites were going to be hand delivered instead via the postal mail so I knew I had no worries as far as trying to stuff these into envelopes. Fun and catchy!
What do you guys think? What DIY craft has been your own creation that turned out better than you thought?
I JOINED A PARTY AND LINKED UP AT THE FOLLOWING:


What a cute idea! I'll be featuring it tomorrow at Creations by Kara. :)
ReplyDelete