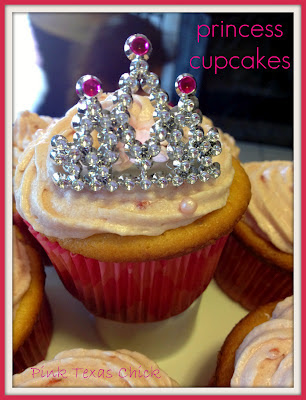
Check out the Pink Princess Cupcakes I made for my girl.
I'm no Cake Boss or Ace of Cakes but I love to bake and although I don't know much, I give it my best shot every time. I also love to bake from scratch but I will confess that this recipe was made with a doctored box mix BUT the frosting is made from scratch and here go the recipes. First, the cupcakes were made with a recipe from The Cake Mix Doctor Returns! book and the recipe for the frosting was taken from the Better Homes & Gardens Special Interest Publications: Cupcakes (magazine).
Princess Cupcakes:
Ingredients:
1 package (18.25) plain yellow cake mix
4 ounces cream cheese, room temperature
1 cup water
1/2 cup vegetable oil
2 teaspoons pure vanilla extract
4 large eggs, 30 min. room temp
1/2 pint strawberries, diced
Strawberry Frosting:
3/4 cup butter, room temperature
3/4 cup strawberry preserves or jam, room temperature
5-6 cups powdered sugar
1/3 cup milk
2 teaspoons vanilla
Directions for Cupcakes:
- Preheat your oven to 325 and line two 2 muffin pans with liners totaling 24 liners.
- Place the cream cheese, water, oil, vanilla and eggs in large mixing bowl and beat with electric mixer on low speed until all ingredients are incorporated. Slowly, add the cake mix and continue to beat until all are incorporated again. Next, beat for two minutes or so until all ingredients all mixed. Be sure to stop a couple of times to scrape down the sides of the bowl.
- Add the diced strawberries and stir with a spatula. This was my own little twist. My baby girl loves strawberries so I added them in the batter.
- Fill each cupcake liner 2/3 full and bake in the oven for 18-20 minutes. Actually, they were done at 17 minutes in my oven.
Directions for Frosting:
- In a large mixing bowl beat butter and strawberry preserves until smooth then add the vanilla and milk.
- Gradually add the powdered sugar and continue to beat a low speed until well incorporated. Feel free to add more milk and powdered sugar if the frosting is not at the desired taste or consistency.
Once the cupcakes are cooled, frost them and decorate as your pretty little heart desires. I used my frosting decorator from The Pampered Chef and I added soft, pink candy pearls. The crowns I used to top off the cupcakes were mini hair combs that I bought at Party City. The strawberry preserves I used were from the HEB Central Market Organics brand. I LOVE that spread and use it all the time.
And that is how I whipped up some strawberry cupcakes aka princess cupcakes for my girl's birthday party. She told me she wanted pink princess strawberry cupcakes so I had to deliver and I believe I did. And I had fun making them. :)
Another princess girly touch that I added to her party were the pink tissue poms I made. I first saw these poms on Martha Stewart's website and then I saw them on so many blogs. I can see why everyone was making them. They are so pretty and add so much oomph and ooh aah to a party. I too wanted to make them right away but I knew I would not be able to display them until my daughter's party. Although they were a bit time consuming, they were quite easy and affordable to make.
I pretty much followed Martha's directions but have my own two cents to add to these poms how-to. You only need 8 sheets for one pom. I bought my tissue at Hobby Lobby for .99 a package. Each pack has ten sheets so I removed two sheets from each one and made a pom from those removed sheets.
Start out by folding each set of tissue sheets accordion style. I used the fold that was already made in the tissue sheets as my guide.
Instead of using floral wire to tie around the middle, I stapled the sheets. I felt this was easier and faster. I also though it was more secure than floral wire.
Before stapling, I used the stapler as guide to make sure I was going to staple in the middle. I just folded the tissue in half instead of eyeballing it. I did not want my staple to be off center and then have the poms look uneven.
After each set was stapled I tied party ribbon, string or whatever it's called around each one. You know, that stuff that you make curly with scissors. Anywho, I tied each one with a double knot and left each string at the desired length. I cut the ends of the tissue with scissors in a rounded shapes. It was quite thick so the snip snips didn't go quite fast but it was do-able. Sorry, I forgot to take photos of the aforementioned steps. I did made these in "shifts" so I did forget to snap some photos. After you trim them, pull each sheet out one by one and fluff it out making sure you have no gaps. You don't want to work too fast or else you'll tear the sheet(s).
And after about 10 minutes with EACH pom they will be pretty and fluffy and will look something like this. Some of my guests had never seen them before so they were impressed. Yay me!
We originally planned to have the party in our backyard but our 70 degree weather decided to go on holiday and in came a cold front with some rain. So having the poms indoors worked out pretty well and they all looked quite cute hanging from my windows. Oh and everyone said the cupcakes were delish. Again, yay me! :)


stapling?! great idea!
ReplyDeleteYes! The stapling saved so much time and to me it held up better.
Delete