Pages

Showing posts with label diy. Show all posts

That's So Witchy {Halloween DIY}

Hola!  Halloween is around the corner and I was finally able to complete this project that I started (in my head) over three weeks ago.  A couple of months ago, some friends of mine were having a garage sale.  I decided to shop at their sale and just before leaving their house I spotted a plain, maroon vase.  My friend gladly gave it to me because she was ready to pack up what didn’t sell and dump it all at Goodwill.  My first thought was to spray paint it but what color and how would I use it?  After some thought I decided to use it as Halloween décor and since I have a few witch hats I then knew what I wanted to do with this vase.


Check it, yo.


And this is what it looked like before:

It is a Pottery Barn vase.  I spray painted a Pottery Barn vase.  Gasp!


Here’s the how-I-did-it down low.

My supplies were Krylon primer, Krylon Glitter Blast in Grape Glitz, and a medium grit sanding block. 


I used an old, clean sock to wipe any dust and debris from the vase, lightly sanded it and then sprayed a couple of coats of primer.


The next day I covered it with the Glitter Blast.  I’m not expert with paint so to the naked eye it is obvious this was not done by a pro.  No prob.  I’ll “fix it” before Halloween next year ‘cause I should definitely be better by then not.


In my best amateur skills, I sprayed 4-5 thin layer coats of the paint.  I waited a couple of minutes in between each coat so I wouldn’t glob it all up.  After 24 hours of dry time I set it up on my dining room table. 

I bought these two tablecloths from the dollar store.


The hat, pumpkin and black crow were bought on clearance from previous years. I also used a small piece of cardboard to help hold the hat steady.  You like?  


Voila.  There is my dining room table a la All Hallow’s Eve mode.  I don’t do table settings, just centerpieces.  Table settings feel too fancy smanchy for me and my laid back family.  I love looking at others though!  And although Halloween is just a few days away, anyone could easily put something like this together for their Halloween festivities come next Wednesday.  Until next time.  :)

Team USA Patriotic Mantel Decor {Craft DIY}

Hey, y'all.  Well just like every American out there I am very proud of my red, white and blue.  And like many Americans I am glued to the telly (London reference there) right now while the Olympics take place.  I may be a tad of an Olympic freak though because I am ALWAYS watching the events, checking the stats, the medal rankings, athlete bios, etc.  So why not display a little Team USA pride on my mantle alongside my future Olympians?  :)

Check it, y'all.


Okay I'll be honest here.  I'm a tee wit proud of my crafts but I really don't feel like going into detail about how I made these because I have given the telly my full and undivided attention.  And I am super tired y'all.  So I thought I would just show off my mantel and explain how I made these tomorrow.  Hopefully.  :)

Nighty nighty and let's hear it for the home team!  

UPDATE: 8/6/12

Hola!  I'm back to show you how I made my patriotic chargers and tulle wrapped frame.  Here is what I used for the charger plates: 3 silver chargers, 1 red, glitter foam sheet, 3 wooden block letters, Martha Stewart craft paint in Indigo and Crafter's Pick glue.

I first sprayed the wooden letters with primer, let them dry overnight and then painted them with the craft paint using a foam brush.


While the paint on the letters dried, I cut three stars out on the foam sheet.  I did not free hand this star, so I googled an image.  I did not do any star search but a Dallas Cowboys "star" search.  Hehe, I am a dork.  I found a star that I was pleased with, copied to a Word document and enlarged to a full sheet size.  That was the right size to fit inside the charger.  


The foam was self adhesive so all I had to do was peel off the paper back and stick it on the charger.  I then glued each letter on top of each star with my favorite craft glue.  In order for it to set and stick well, I put a jar or can on top of each letter and let them sit over night.


After everything was said set and done, my patriotic chargers were done and ready for my mantel.  I was really hoping to have made these for July 4th but my precious time said no can do.  But at least I had them done in time to kick off the Olympics and cheer for Team USA!


Patriotic Glitter Tulle Frame

I came up with this frame after I saw a patriotic frame at Hobby Lobby.  One of my fave stores.  My daughter is always asking for things with "sprinkles" aka glitter, simmer, bling, etc.  My little diva knows what she likes!  :)

So I came up with this idea after seeing the frame at the store and noticing that the rolls of tulle was on sale for half off.  I purchased my supplies- all on sale or with a coupon like a good crafter.  :)

Here is how I made my frame with red, white and blue sprinkles.

I bought an 8"x10" wooden frame from Hobby Lobby with a 5"x7" opening, three rolls of glitter tulle and 1 silver glitter foam sheet and a medium size star shape paper puncher.  I also used a low temp hot glue gun.


I cut 9 strips of tulle in each color, 20 inches long.  I first started with the blue tulle and wrapped it on the left side of the frame.  I first used the Crafter's glue but quickly realized that using a glue gun would be faster and not as messy.  So take my word for it, DON'T use a craft glue.


I wrapped each strip of tulle on the frame overlapping as much as possible so the wood would not show through too much.  After the blue tulle, I alternated between the red and white tulle starting with the red.  Afterwards, I tucked any extra tulle down with the glue gun.  No biggie.


I then got the star paper punch and punched out one star on some card stock (actually it was someone's business card that I was about to toss).  heehee.  I then used that one star to trace on the back of the silver glitter foam sheet.


I traced about ten stars or so but only ended up using seven of them on the frame.  Oddly enough this foam sheet was not a self-adhesive (like the red one on the chargers) so I had to use the glue gun to put the stars on top of the blue tulle.


Finally after about 30 minutes I had this pretty Team USA frame displaying my future Olympian.  :)


It's not the best quality photo in fact it is a computer paper print out of my daughter and my husband.  I was not able to get an actual photo but I wanted something NOW so this is the temporary photo.  It is a picture of my daughter at her first gymnastics class.  She was a wee bit shy and wanted her Daddy by her side.  He made her feel all better and on she went with the rest of her class.  I LOVE this picture of the both of them.  Maybe it will be used in a P&G commercial when she makes the US Gymnastics team.  :)

P.S. The tulle definitely made the opening of the frame smaller than a 5"x7" so I gently pushed the pictured into the opening and then taped the thin cardboard behind the photo.  I didn't know what else to do but it is a temporary solution and for now it is holding up well.


Once again, here is my patriotic mantle.


I am so enjoying watching the Olympics every day and night. Yep, I am totally losing sleep because I go to bed late every night but I can't help myself.  I am in awe of the games and have been since I first saw Mary Lou Retton score that gold at the '84 Olympics in Los Angeles.  Ever since then I have been an Olympic freak.  Ask my poor husband.  That includes the winter games too.  I am into everything from start to finish- opening ceremonies to closing ceremonies, interviews, mini documentaries, etc.  Told ya I was an Olympic dork.  :)

Easter Egg and Vase Decor {Craft DIY}

Happy Good Friday lovely people.  Easter is my favorite holiday and sadly I haven't decorated much for this Holy celebration.  I have been so busy (I'm always saying that!) and I won't dare go up in the attic to get my decorations.  The attic freaks me out so I always send the hubby to get my things; although he too is a very busy man this tax season.  Anywho, I started this craft project a few weeks ago and just finished it this morning.  Seriously.

Pink Texas Chick


Easter Bunny Treat Bags {Craft DIY}

Happy Spring everyone!  We here in Texas are lovin' this great weather but many of my peeps are also suffering from seasonal allergies.  Boooooo!  I feel their pain.  I used to be in the same boat month after month.  Anywho, let's get to my latest creation.  I will be the first to admit that it did not quite turn out the way I pictured it in my head but my two cute handy sidekicks gave me their "thumbs ups" approval.  Yay me. 


Easter Carrot Decor {Craft DIY}

Howdy y'all!  I had to greet you all in Texan talk because today is Texas Independence Day.  Yee-haw!  Okay, I really don't talk like that unless I'm goofing around with my kids and no one else is around.  :)

Easter is a little over a month away so I have begun decorating and getting my craft on and I started out with some carrots.  Just like Halloween, I wanted to dress up my little hallway area and I kinda sorta challenged myself.  The challenge was to decorate the area for Easter but with no eggs whatsoever.  After about three days of thinkin' I thought I would try to make carrots out of styrofoam cones. 
Yep, I thought it and I did it.  Check it:


Okay, so here is the low down to this faux bunny food craft.  I started out using two different size styrofoam cones and cut each one in half.


I then sanded the edges to smooth them out and I also sanded the tips to give them a more rounded look.


Next, I began to paint the cones.  I painted them the same way I painted the eyeballs on my Halloween wreath.  I poured the paint onto the cones, stippled the paint with a foam brush and repeated as necessary.  I also used a large paper clip to hold the cones as I painted.  I used Jack-o-Lantern orange by Americana.


While the "carrots" dried, I snipped each stem from some greenery I bought at Hobby Lobby.  I used nose hair pliers to clip each stem.  I got a little tutorial from my hubby on how to use this thing.  I thought I was supposed to use the tip to clip, er, nope.  After 10 minutes I was utterly frustrated until the mister laughed at me and showed me how.  Ohhhhh, okay got it now.  :)  I don't know what this type of greenery is called but the number on the tag said 830083 and it was made in China.  oops.


Alrighty, almost done.  After the cones were dry I inserted two stems at the top of each cone.  No need for glue or anything.  Just take a stab it and push each down as far as you can get it in there, no wiggle rooms for these guys at all.


Lastly, I tied some yellow ribbon around each carrot and used that same ribbon to hang the carrots from my wall sconces.  The candles on the sconces including all of my supplies for this project are from Hobby Lobby.  I heart Hobby Lobby and their sales and their weekly coupon.  :)


I must say I surprised myself but it was pretty cool to wow my kids once they saw the end result.  I think I'll continue to challenge myself and see what I come up with next.  :)

Linking up with the parties listed on the column to the right of this post and the following Spring Craft Party with Centsational Girl:
spring fling banner

Valentine Yarn Wreath {Craft DIY}

Hola.  Well before I begin to show you my Valentine's Day wreath I kinda want to pat myself on the back because this wreath makes my third one in five months. I had never made a wreath before until this past October when I made my Halloween wreath.  Wreath making is one of those crafts I never tackled and always wanted to but never did because I just did not know where to begin. After a little planning and inspiration I came up with this wreath:

Pink Texas Chick


Pinned Image
Pinterest
I have seen many yarn wreaths around the dubya dubya dubya (internet) and that stroked my curiosity to make one for my freshly painted front door.  My inspiration for this wreath came from the many yarn wreaths I've seen and also from this front door decor I pinned on Pinterest a few weeks ago.  --------> Cute, huh? It's actually a seller on Etsy that has this up for grabs.

Anywho, here goes the lowdown on how I made my very first yarn wreath.  First let me begin by saying that my hands and wrists were sore after wrapping the yarn around over and over.  Don't think I'm going to make another one soon.  :)


Valentine's Day Yarn Wreath
Supplies:
* 1 - 12 in. foam wreath
*Yarn in Sweet Mocha by I Love This Yarn!
*Craft glue
*Brown chipboard letters
*Pink adhesive gemstones (scrapbook item)

Step 1
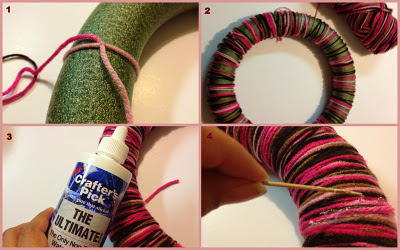
To begin, I tied a double knot on the wreath and tucked in the loose piece of yarn a little before wrapping around.

Step 2
In clockwise motion, wrap the yarn around the wreath starting at the knot.  It took me three whole turns to completely cover my wreath therefore I had plenty of yarn leftover.

Step 3 & 4

Snip the yarn once you are happy with the coverage and glue down with craft glue.  I used Crafter's Pick The Ultimate! glue and I am loving that glue more and more.  I rely on it more than my 'ol glue gun.  It has lots of holding power.  After applying the glue, I used a toothpick  to pat the yarn into place.  The glue dries clear so there is no obvious mark.


Step 5 (picture not shown)
Sorry, but I accidentally deleted the picture of the chipboard letters and stickers being put on the wreath.  But it is a cinch and I'm sure you figured it out, right?  :)
Place some gemstone stickers on the letters however you please and then using the craft glue, glue the chipboard letters onto the wreath.  Again, in the order and fashion you desire.  The chipboard letters are just like the ones I used in my hair bow holder.

And that is how I made my Valentine's Day Wreath.  I just love those colors on that yarn.  Maybe I'll ask grandma to help me make a blankey or scarf with that yarn.  It's too pretty not to use again. :)


I am linking up with these fab bloggers:
Creations by Kara * Verry Merry Vintage Style * I Gotta Create
A Diamond in the Stuff * Ginger Snap Crafts *My Romantic Home
The Artsy Girl Connection  One Artsy Mama * Sew Woodsy
Night Owl Crafting * Tatertots & Jello * Nest of Posies

A Special 'Handmade' Thanksgiving Wreath

Hello, hello.  It has been a while and I'm sawy.  I have been super busy lately and lots of holiday stuff is sneaking up on moi.  As I said before, everyday I'm shuffa-ling!

Okay, so Thanksgiving is a little over a week away and I finally finally made a very simple wreath for my door.  I wanted a wreath using the hand traced cut outs of my kids' hands.  After some world wide web searching for ideas I decided to use my kids hands as the feathers of a turkey.  So this is what I created:


As you can imagine, it was very simple to do except it took a little bit of time making the turkeys.  Other than that it was easy to put together.

I made the turkeys using:
  • soft foam sheets: red, orange, brown, beige
  • yellow, white and black card stock
  • adhesive pop-ups
  • glue and hot glue gun
Step 1:
I traced the hands of my boy and girl on each sheet.


Oh yes that is a Dallas Cowboys pencil I am using.  Loyal fan for-eva!

Step 2:
After tracing their hands, I cut them each out and used one set for each turkey (a totoal of four hands for each turkey). 

Step 3:
I placed each hand cut out on top of one another until it formed the feather formation I liked.  I glued each one together with my hot glue gun.  For the bodies of the turkeys, I used a small bowl and a cup to trace and cut out from the brown foam sheet. Again, I glued the bodies to the feathers with my hot glue gun.


Step 4:
I made the eyes the same way I did my halloween treat bags.  I used the the white card stock and black pop-ups on the bigger turkey; and the black card stock and white pop-ups on the smaller one.
As for the nose, I just snipped a corner off of some yellow card stock and voila I had me some noses.


Step 5:
After my turkey assembly, I grabbed my wreath and glued on some dried natural grass to create a nest.  Glued my birds on top of that and then decorated it with fall floral picks.  I added some ribbon to hang it up and I was done.  Although I need to learn how to properly make a bow. No, I don't know how to make one.  Gasp!


My first Thanksgiving wreath and it has a special 'hand' made touch.  I love it.  Next year I'll add a couple of improvements but for now I am content and so happy that I was able to incorporate my babies hands.  Happy Mama.  :)

I'm linking up with these fab bloggers:

Snack Station {Halloween}

Hello, happy Friday and happy kickoff to Halloween weekend!  I know, I know I’m rarely on here but I finally got a light under my butt to p...