Pages

Team USA Patriotic Mantel Decor {Craft DIY}

Hey, y'all.  Well just like every American out there I am very proud of my red, white and blue.  And like many Americans I am glued to the telly (London reference there) right now while the Olympics take place.  I may be a tad of an Olympic freak though because I am ALWAYS watching the events, checking the stats, the medal rankings, athlete bios, etc.  So why not display a little Team USA pride on my mantle alongside my future Olympians?  :)

Check it, y'all.


Okay I'll be honest here.  I'm a tee wit proud of my crafts but I really don't feel like going into detail about how I made these because I have given the telly my full and undivided attention.  And I am super tired y'all.  So I thought I would just show off my mantel and explain how I made these tomorrow.  Hopefully.  :)

Nighty nighty and let's hear it for the home team!  

UPDATE: 8/6/12

Hola!  I'm back to show you how I made my patriotic chargers and tulle wrapped frame.  Here is what I used for the charger plates: 3 silver chargers, 1 red, glitter foam sheet, 3 wooden block letters, Martha Stewart craft paint in Indigo and Crafter's Pick glue.

I first sprayed the wooden letters with primer, let them dry overnight and then painted them with the craft paint using a foam brush.


While the paint on the letters dried, I cut three stars out on the foam sheet.  I did not free hand this star, so I googled an image.  I did not do any star search but a Dallas Cowboys "star" search.  Hehe, I am a dork.  I found a star that I was pleased with, copied to a Word document and enlarged to a full sheet size.  That was the right size to fit inside the charger.  


The foam was self adhesive so all I had to do was peel off the paper back and stick it on the charger.  I then glued each letter on top of each star with my favorite craft glue.  In order for it to set and stick well, I put a jar or can on top of each letter and let them sit over night.


After everything was said set and done, my patriotic chargers were done and ready for my mantel.  I was really hoping to have made these for July 4th but my precious time said no can do.  But at least I had them done in time to kick off the Olympics and cheer for Team USA!


Patriotic Glitter Tulle Frame

I came up with this frame after I saw a patriotic frame at Hobby Lobby.  One of my fave stores.  My daughter is always asking for things with "sprinkles" aka glitter, simmer, bling, etc.  My little diva knows what she likes!  :)

So I came up with this idea after seeing the frame at the store and noticing that the rolls of tulle was on sale for half off.  I purchased my supplies- all on sale or with a coupon like a good crafter.  :)

Here is how I made my frame with red, white and blue sprinkles.

I bought an 8"x10" wooden frame from Hobby Lobby with a 5"x7" opening, three rolls of glitter tulle and 1 silver glitter foam sheet and a medium size star shape paper puncher.  I also used a low temp hot glue gun.


I cut 9 strips of tulle in each color, 20 inches long.  I first started with the blue tulle and wrapped it on the left side of the frame.  I first used the Crafter's glue but quickly realized that using a glue gun would be faster and not as messy.  So take my word for it, DON'T use a craft glue.


I wrapped each strip of tulle on the frame overlapping as much as possible so the wood would not show through too much.  After the blue tulle, I alternated between the red and white tulle starting with the red.  Afterwards, I tucked any extra tulle down with the glue gun.  No biggie.


I then got the star paper punch and punched out one star on some card stock (actually it was someone's business card that I was about to toss).  heehee.  I then used that one star to trace on the back of the silver glitter foam sheet.


I traced about ten stars or so but only ended up using seven of them on the frame.  Oddly enough this foam sheet was not a self-adhesive (like the red one on the chargers) so I had to use the glue gun to put the stars on top of the blue tulle.


Finally after about 30 minutes I had this pretty Team USA frame displaying my future Olympian.  :)


It's not the best quality photo in fact it is a computer paper print out of my daughter and my husband.  I was not able to get an actual photo but I wanted something NOW so this is the temporary photo.  It is a picture of my daughter at her first gymnastics class.  She was a wee bit shy and wanted her Daddy by her side.  He made her feel all better and on she went with the rest of her class.  I LOVE this picture of the both of them.  Maybe it will be used in a P&G commercial when she makes the US Gymnastics team.  :)

P.S. The tulle definitely made the opening of the frame smaller than a 5"x7" so I gently pushed the pictured into the opening and then taped the thin cardboard behind the photo.  I didn't know what else to do but it is a temporary solution and for now it is holding up well.


Once again, here is my patriotic mantle.


I am so enjoying watching the Olympics every day and night. Yep, I am totally losing sleep because I go to bed late every night but I can't help myself.  I am in awe of the games and have been since I first saw Mary Lou Retton score that gold at the '84 Olympics in Los Angeles.  Ever since then I have been an Olympic freak.  Ask my poor husband.  That includes the winter games too.  I am into everything from start to finish- opening ceremonies to closing ceremonies, interviews, mini documentaries, etc.  Told ya I was an Olympic dork.  :)

{Texas Proud} Texas Rangers Baseball

Two weeks ago the family and I took a little road trip up north to Arlington to see our very first Texas Rangers Baseball game.  We did a little Texas staycation just like last year.  We were all excited but my very own lil slugger was over the moon excited.  Baseball is his passion.  Not a day goes by when baseball is not part of his day, thoughts or dreams.  He always asks if I'll be at his games once he's a pro.  Big dreams and optimism.  I love it.  Of course I'll be there; I'll be that mom that is annoyingly proud and cheering like no one is sitting next to me.  :)

After one too many pit stops along the way we finally made it to our hotel.  We stayed at the Marriott Townelace Suites right across the street from Six Flags Hurricane Harbor.  I love Marriott hotels.  I always check with a Marriott hotel before anywhere else.  We checked in, checked out the place, got ready and jumped back in the car.  Although we weren't quite ready because we didn't have any Rangers gear.  Well being the cheapies that we are and already knowing that there was a Wal-Mart across the street from the Cowboys stadium we made a bee line to Wally Mart.  Sixty bucks later we had our Rangers gear, changed in the car and a hop, skip and a jump later we were parked again and walking towards the stadium.

Upon entering, buying some good 'ol ballpark food and finding our seats this was our view.


In my mind I was a little disappointed but my boy wasn't because he was just ecstatic to be there so I stayed mum.  No, really I wasn't going to say anything to the hubs.  It was a last minute purchase after all.  We each had a "wow" moment when we walked in and saw the field, the people, the signs, the players warming up, everything.  It was kewl!!  There is a BUT in this family field trip.  The sun!  Our seats were facing the sun so this was in our faces for about 2 1/2 hours.


Oh yes we got our vitamin D this sunny Texas day.  Oy.  The Texas sun is not forgiving and we got lucky because it had rained earlier in the day.  The rain kept the temperature in the 90s instead of the triple digits.  Yep, 90+ temperatures is a breeze for us native Texans.  :)

After the sun went down we took our first family Rangers picture.


Yep, that's my girl wearing a pink Rangers hat.  She had to be fly and make Mama proud.  :)
Everyone had a great time at the game.  My girl enjoyed some pink cotton candy to go with her outfit and my boy had his glove ready to catch a ball.


Ooh and this guy here is Josh Hamilton.  Nice toosh.  :)


Oh and I have to share this one of the flag girls 'cause this is what I did my freshman year in high school.  I'm sure I can still totally do a triple aerial and not whack myself in the face. Bet. (yeah right)


And in the end we of course had to make a stop at the souvenir shop.  My girl knew right away what she wanted once she spotted it.  She wants to play ball like her brother.  :)


My boy on the other hand wanted one of everything and could not make up his mind.  :)

   
It turned out to be a late night and we went back to our hotel room and crashed; after showering of course 'cause we were one stanky, sweaty family!  Day 2 was all about the Ft.Worth Stockyards.  I'll tell you all about it in my next post.

Even though they lost it was still a grand night and a beautiful sight at the Texas Rangers Ballpark.  :)


Large Utensil + Knife Drawer Organization

Hey peeps!  All two of ya that stop by on your work breaks.  hehe.  Well I last showed you my utensil kitchen drawer that was organized and last night I was able to finish my large utensil kitchen drawer.  Check it out y'all!

Pink Texas Chick


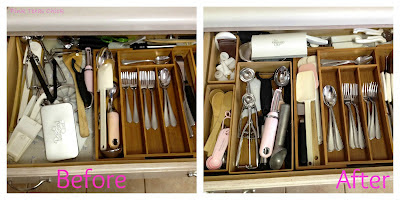
And this is what it looked liked before:


That blue towel is where we kept our knives because we don't have a butcher block and we've never had one.  We just kept knives there so they wouldn't get mixed up with the other utensils and risk cutting our hands while rummaging through the drawer.  How lame.


First, I bought a expandable large utensil tray from Bed, Bath and Beyond (with a coupon of course) and assumed it would take up the entire space of the drawer.  So with that in mind I was also going to buy a Kaboosh knife holder to keep on the counter top.  Well it turns out the utensil tray was too long to fit in my drawer.  See?


I was bummed for a few moments because I really wanted to have full use of the tray while completely expanded.  No can do.  I then turned it to see if it would fit and if it would work.


It did fit but I was not able to fully expand it.  I did realize that I had a decent amount of space on the right side of the tray and wondered if a knife tray would fit in that area.  So I grabbed my son's handy dandy kids measuring tape then looked on-line for the knife tray.  According to my measurements I had about an inch or two to spare if I went with the knife tray.  The next day I stopped at BBB with coupon in hand and bought this:


It is a Knife Dock that has cork-like material already slit and inserted in the tray.  Right away I liked this idea much better than the Kaboosh (I really didn't want big butcher knives stored on the counter) and was a little too excited when I saw that it fit well in my drawer with the large utensil tray.


I once again cleaned the utensil tray with my vinegar/lemon juice/water solution and I had a feeling that the knife tray would have some residue of sort from the cork material.  Sure enough I turned it upside down and hit it a few times and all this fell onto the counter.


Looks like a bunch of little bugs and one big one, huh?  It was a little annoying to do that but I'm glad I did so that I won't have to mess with that stuff sticking to the blades of the knives every time I take one out.  Well I hope I won't see anymore of that stuff.  Anywho after all my prepping I placed most of the large utensils and the knives in their respective trays.


What a difference!  Did you notice my pink knife?  :)  I was not able to fit all of the utensils and this is what was left over on the counter.  They just weren't the right fit.  heehee.


I no longer use those black utensils so off to Goodwill they go, the wooden spoons will go in my utensil crock that sits on my counter and the cheese slicer, pastry blender, large tongs, and rolling pins will be placed elsewhere.  Somewhere in my bottom cabinets.  This of course creates a new organizing task because I really need one for all things baking.

Once again here is the before and after.


Yay, yay, yay for the little yet big things that make a huge difference and much more functional.  Next is the junk/catch-all drawer (hey, we all have one) and then the pantry.  Oy to the pantry.
Am I the only that gets nerdy and just stares at the neatly organized kitchen drawers just to admire their beauty?  The hubs thinks I'm a bit of a geek that way.  :)

And since I have been pinning lots of organizing items and ideas on Pinterest, I am sharing this post with Young House Love, Bower Power, Centsational Girl and Ten June  during their Pinterest challenge.  It's a challenge to get us pinners off our booties and start an actual project.

Also sharing this post with Organize and Decorate Everything.


Kitchen Drawer Organization

Last night I finally got around to organizing one of my kitchen drawers.  It has never been organized, we just toss utensils in there.  Okay I really didn't toss them, the hubs did but I really tried to line them up and make them look organized.  Nope that never worked.  The eating utensils were the only ones that had a home but even that compartment was squeezed down because the other utensils took up so much space and the expandable compartment was never fully used.

Well hallelujah look at the before and after:

Thanks to my 20% coupons from Bed, Bath and Beyond I bought three bamboo drawer organizers to complete this long overdue project.  All of these drawers are made from bamboo and the three on the left are from BBB and the one on the right with the eating utensils is from Wal-Mart.

Before organizing I emptied out the entire drawer, vacuumed it and cleaned it off with combination solution of vinegar, lemon juice and water.  Yep, I had to bust out the vacuum because there were crumbs towards the back of the drawer.  What the...?  I also gave all the utensils a quick wash and rinse in the sink.  I felt the need to do that since I vacuumed.


After it was all said and done I carefully thought about where each utensil was going to live. I have everything where I want it and because I am the queen of my kitchen it all makes sense to me.  :)


Now I'm on to the next organizing project.  I'm about to be on a roll!  Happy Saturday, y'all.  :)

Shopping in the Clearance Aisle

I'm on a mission, folks. On a mission to save as much as possible here and there and everywhere! (I totally grew up on Dr. Seuss books) Seriously, I'm tightening the wallet for various reasons therefore I have challenged myself. If and when I go shopping I'm going to look in the clearance section before looking around anywhere else in the store.

I decided to do this back in May and I've had quite the fun on this self imposed challenge. Now let me clarify that I am not one to always pay full price or scoff the clearance aisle. Honestly, I don't have much patience for all the clutter and craziness that is had in that section and that is why I often stay clear. I'm more of an expert when it comes to buying goodies on sale or with a coupon. :)

Now that I have challenged myself I look forward to the "price reduced" treasures waiting to be found. Wow, that sounded way goofy. Okay on to what has come home with me.

My first stop was at Kohl's because I had a $20 gift card. I went straight to the jewelry department because mommy has lost some earrings and bracelets. That is partly my fault and partly my little diva's fault. :)

My final price for all of this was $3.71!


I scored three pairs of earrings and a set of bracelets.  All oh so purdy (and cheap) to me.  


Here is my receipt for the breakdown.  These four items went from regular price to sale price to clearance price and after my $20 gift card I paid less than $4 and I am now a little more stylish.  :)


I was at Marshall's one day when I spotted the clearance end cap in the home section and saw this really pretty, white and simple serving bowl.  I immediately thought of my husband's Nana whom loves to have big family dinners buffet style.  I knew this would be perfect for the dinner table and it was only $6.  whoo hoo!  It wasn't much of a drop from Marshall's regular price but the "compare to price" was $16.  And Nana loved it! :)


Okay this next one I was uber excited about because I looooove to bake but I still lack many baking supplies.  I found a set of 3 cookie baking pans for $6.49.  I have plenty of baking sheets but no baking pans.  Imagine my delight when I found these at Ross (dress for less) one day after shopping next door at Hobby Lobby.  Now I can make some oatmeal granola bars that I've been dying to make for quite some time.  Yay me!  It's the little things.  :)


So here are a few things from my self imposed challenge.  Winning! Until next time, peeps.  :)

Snack Station {Halloween}

Hello, happy Friday and happy kickoff to Halloween weekend!  I know, I know I’m rarely on here but I finally got a light under my butt to p...