Pages

A Pink and Zebra Hair Bow Holder {Cute!}

Last weekend one of my bff's had her daughter's third birthday party and the theme was pink and zebra.  Right away I knew that I wanted to get her a gift with that color scheme.  I looked around a couple of stores but didn't find anything that really caught my eye so I said the heck with it and told myself to make her a gift.  I pondered for a bit and remembered that I had seen hair bow holders at holiday type craft shows and on the internet here and there.  I had never made one and figured it couldn't be all that difficult, right?  Nope it wasn't and I was actually surprised and a little pleased with myself.

Okay here is how beginner crafter me did it and if there is a better or easier way then please help a sista out and lemme know!  :)

Here is this pretty little thang I made.


Step 1:
I used a 16"x20" canvas, a bottle of bubblegum pink Americana acrylic paint, a wide sponge brush and a paper plate.  Oh and some newspaper too of course.


Step 2:
Let the paint dry for at least 4 hours or overnight like how I did. Use three three different colored/design ribbons for the board.  Cut each ribbon long enough to fold over on the back for gluing. Lay the ribbon out on the board to determine the spacing.  I used a few of my daughter's bows to help me space out each ribbon before gluing them down to the back side of the board.

Step 3:
Tape each end of each ribbon down on the board BEFORE you begin to glue.  Yes, this was a little time consuming for me but it was the only way I could think of keeping the ribbon in place in order to flip the board over for gluing.
Step 4:
Carefully flip the board over and start gluing each ribbon end with a hot glue gun. Take the tape off of the glued end before working on the other side.  This way you will be able to give the ribbon a little "pull" before gluing the second side.  Gluing both ends of the ribbons and then removing the tape may leave a little too much space between the ribbon and board. 


I used the back of a spoon to smooth out the glue because it was a bit too hot for my fingers.  I also used a ruler to guide me as I want along just to make sure my ribbon was not off center.

Step 5:
Flip the board over and make sure all  is good and securely glued.  It's beginning to look purdy purdy!
Cut a piece of ribbon (I used the zebra design) a little longer then the width of the board.


Fold the ribbon in half, cut it and place it design side down on the back of the board. Glue it down, flip it over again and tie a knot at the top. 

Step 6:
Okay, we're in the home stretch.  I didn't want to hand this board over with just ribbon on it so I thought adding her name with some black chipboard letters (scrapbooking section at Hobby Lobby) and touch of bling would give it that perfect touch.

I lined up the letters on the board and then glued each one down with my hot glue gun. It's been over a week since I gave her this gift and the letters are still holding up but I think there is a better alternative to the hot glue gun for this one.  A couple of the letters were a little wishy washy so I added more glue and stuck them back on.  Still, will use different glue from now on.  Not sure what kind as I need to research that mo' better.


Here it is again and with the pretty little princess happily posing with it.  Ain't she a cutie?


I was a little proud of myself and it looks much prettier in person.  I think I will make more!

FYI: I purchased most of the supplies from Hobby Lobby either on sale or with a 40% off coupon.

I'm linking up with these fab bloggers:

The Witch Stop {Halloween Décor}

As much as I like and celebrate Halloween, I don't have much décor.  I am slowly building up my Halloween stash with every clearance sale on November 1.  J

With that said, I was able to use a few of the few things I have on hand and decorate one of my walls.  We have a narrow, almost bare wall that connects the dining room and kitchen.  All I have on it are two wall candle sconces.  Pretty boring.  Well this year I spruced the area up with a little Halloween touch and all for under $10.  Everything pictured below was purchased on clearance, sale or I already had it on hand.  I just had to get a little creative.


And this is what my wall looked like before the witch stopped on by and hung up her hat and broom.  I told ya it was boring.
First I bought two orange candles at Hobby Lobby that were 50% off and decorated them with some bat stickers that I got for 40% off also at HL.

Holy batman those turned out cute!  :)
Next I took a plain yet glittery orange broom that I had on hand and decorated it with some black, glittery tulle (50% off at HL).

I folded the tulle three fold and wrapped it around the broom like a scarf.  I also tied some ribbon around it and instantly it looks much better than just a plain-o-broom.

I then tied some Halloween ribbon to the broom and witch's hat (that I got on clearance two years ago) and hung each one from my wall sconces, then I placed the candles on top.  Ta da!  It is simple and not too much but I love it.


Happy Halloween!

Linking up with these fab bloggers:

Halloween Eyeball Wreath {Craft}

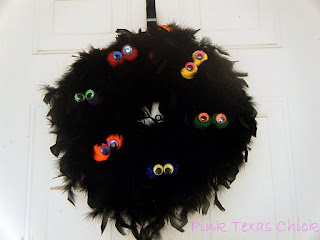
Holy Batman!  Lately I have had the major craft bug and I'm loving it.  I joined Pinterest a few months ago and my Halloween board was one that I was having lots of fun with so many great ideas.  Out of two pins I came up with this fun wreath:

Pink Texas Chick
halloween door
allyou.com
Peering Eyes
BHG.com

My inspiration:


        +
Here is what I used to make it and how I did it:
  • 12" foam wreath
  • 2 black feather boas
  • 1 pkg of small 12 Styrofoam balls
  • craft paint & sponge brushes
  • 1 pkg  of multi-color googly eyes
  • hot glue gun
Step 1:
Paint the Styrofoam balls the color or colors you wish.  I painted mine orange, purple, green, red, yellow, and blue.  I used a jumbo paper clip to hold each Styrofoam ball while I painted.

I also used a dish grip separator thingy to hold on to the paper clip while I painted.  To keep it from slipping from my fingers ya know.  Oh and did you notice the handsome fellow there hitting on me?  :)
I found that it worked best to pour the paint on each ball and then dabbed it in with the sponge brush.  Dipping the sponge brush in paint and then on to the ball did not work very well.


After a couple of minutes of paint dabbing you have each ball looking like this:


Step 2:
While the paint dries on the Styrofoam balls, you can begin to work on the actual wreath. The ends of the feather boas are attached as one big loop so you have to cut where the two ends are knotted together.  Add a strip of glue to the foam wreath where you want to place one end of the boa and attach. 

Wrap the feather boa around the wreath to get full coverage.  There is no need to glue the entire boa to the wreath, just the ends of the boas.  I found that 1 boa only covered half the wreath and luckily I had two on hand.  When you get to the second half, glue the second boa just like how you did in the beginning.  Sorry, folks, I forgot to take photos of this process but it's easy cheesy.

Step 3:
Glue your painted Styrofoam balls together to make a pair of eyes with the hot glue gun. I glued them where I had some white left because that is where the paperclip was inserted.


Step 4:
Once you have your feather boa on the wreath and the Styrofoam balls glued together, add a strip of glue on the wreath to place the eyeballs.  Carefully separate the boa where you want to glue and then quickly attach the Styrofoam balls. Be sure to have those feathers out of the way or else they'll get on the glue.  Add the googly eyes with the glue gun once the eyeballs are in place.


Step 5:
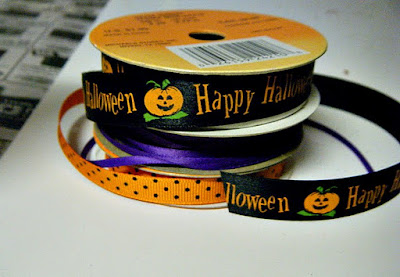
Use some Halloween ribbon to hang your wreath.


You can't see my Halloween ribbon in the pic but I know it's there and sometimes it peeks out.  :)


Bada bing bada boom you have yourself a not-to-spooky yet fun Halloween wreath.  My kids love it especially since there are so many colors.  It was my son's idea to use the multi-color eyes instead of the normal black/white ones.  He sure is getting crafty clever!

I am linking up with these fab bloggers:
Creations by Kara * Verry Merry Vintage Style * The Thrifty Home
I Gotta Create * Night Owl Crafting * A Diamond in the Stuff
Ginger Snap Crafts * My Romantic Home * Beyond the Picket Fence
Itsy Bitsy Paper * The Artsy Girl Connection

Motherhood: Everyday I Am Shufflin'


I remember seeing that commercial many times when I was a young girl and at the time, I did not understand it.  I just went with the flow whenever the grownups around me would say it many times jokingly.  Well now, I get it.  I totally get it. 
I am the proud and privileged mom to two beautiful creatures that the great Lord gave me and I could not ask for a better pair of kids.  Originally, Mr. DP3 and I wanted four kids but after bebe numero uno, we thought ‘well let’s just see how it goes.’  Ha.  Yeah, we were beyond exhausted and the recovery process from my c-section was not all rosy and peachy.  For now, I will not go there and please do not get me started. 
Anywho, we have our handsome boy and our beautiful girl.  I am SO glad I have one of each.  I really am and I just love doing the boy things and the girly things.  As many parents have said before me, my kids are my pride and joy. 
So just, remember that I love them more than words could ever express and that they are my pride and joy.  Okay?  Just remember that, okay?  K.  J
Because oh my gosh am I tired every.single.day.  Can I get an amen?  I don’t know about all you other mama bears out there but I actually daydream of napping all day long and taking bubble baths.  I do stop and smell the roses and wonder what in the world I ever did with my time before I had kids.  Really.  What the hell did I do with all that time? 
Everyday I’m shufflin’ as the current pop group, LMFAO, sings in their Party Rock Anthem song. Yep, every day I am shuffling.
·         My boy has baseball practice once a week and one game a week.
·         He also has two Cub Scout den meetings a month and one pack meeting a month.
·         I do one load of laundry a day in order to keep up with it and so that it will not get out of control, (which has happened and am sure will happen again).
·         My dishwasher is loaded daily and sometimes twice a day on the weekends.
·         Every day I clean a different part of the house just to start over again once the week has ended.  le sigh.
·         Every day I rush out of work to get my daughter from pre-school and my boy from after school care. 
·         Every day I try to have dinner out ASAP because then I’ll start hearing the “I’m hungry” cry.
·         Every day my boy needs help with homework and then we work on his reading skills.
·         Every day my girl puts up a fight when it comes to bedtime and takes f-o-r-e-v-e-r to fall asleep.
·         Every morning I have a hard time waking her up and getting her dressed.
·         Every day I try to spend quality time with my kids, together and individually. 
·         Every day I try to spend quality time with the mister but he too is quite the busy man working, studying day in, and day out.
·         Every day I try to have “me” time.  Ha!  I made a funny.
·         Every day I’m shufflin’
I did not even mention the constant birthday parties, school functions, family functions, or church functions.  Don’t get me wrong, folks.  I am not complaining.  I love my life and I love being a wife and mother.  You just don’t know how hard it is until you do it but; then I realize that it is all worth it.  At least to me it is and I know it is to all of you moms and pops too.  I love my kids and the way they love me back.  I love baking cookies for them, surprising them with some fresh squeezed limonada (limeade) on a hot Texas day or making them atole de avena (oatmeal) on a chilly morning. 
And although I do something every day, my house is far from perfect every day.  Believe me.  Laundry always needs to be folded and put away and even if I’m always cleaning, there is still a mess somewhere else in the house. 
So yes, Calgon can take me away but not for long because I have to get back to my hubby, beautiful babies and the crazy, hectic but fun whirlwind I signed up for when I said ‘I do’.  J

"Calgon, take me away!"

Chair Covers {Halloween}

I was browsing through the world wide web (as Mr. Bill Clinton calls it) looking for Halloween ideas hoping it would spark some kind of creativity when I saw some really cute candy carriers over at PB Kids.  They had a really cute bat carrier that got me thinking and wondering what I could do with a bat.  I then remembered that PB Kids had some Halloween chair covers a couple of years ago that looked easy enough to make yourself.  Soooooo, I attempted this craft project for the first time. 

Here is what I made for my lovely kiddos:

A bat for my boy with a kinda creepy smile.
And a Hello Kitty with a little Halloween touch for my girl.


I know, I know it doesn't look like much but it was my first time making something like this and to be honest they turned out better than I thought but not as good as I had hoped.  Clear as mud?  Good.  Now on to how I made them.

Bat
Step 1:
I printed out a bat stencil, cut it and traced it on black felt with fabric chalk. I used sewing scissors to cut through the felt instead of regular scissors.  Prolly doesn't matter but just FYI.


Step 2:
I used a 3/4" paper puncher to make the eyes.  I traced the punch out on gray felt with a fabric marker, then cut them with my sewing scissors.
Step 3:
I glued the gray circles on the bat and then glued small, red pom poms on top.  I used felt glue that I bought at Hobby Lobby with a 40% coupon thank ya very much.


Step 4:
I cut very thin strips of off-black felt and used those as defining lines on the bat wings.  I laid out the strips they way I wanted them to look then put felt glue on top, flipped them over and pressed down.
I made the smile out of the left over cut out from the gray eyes.


Hello Kitty
Step 1:
Like the bat stencil, I found a Hello Kitty stencil and traced that one on white felt using my fabric marker.  The fabric chalk was too light to see on the felt.

Be sure to put something to weigh down the paper as you trace.
 

Step 2:
I then cut out the bow, eyes, nose and whiskers from the printed stencil and used those to cut out on the felt.
I traced the bow on orange felt and cut it out.

They eyes and whiskers were cut out from the black felt and the nose from yellow felt. I then used the paper stencil (what was left of it) as my guide to line up the face on the white felt. Again, I glued it all down with the felt glue.


Step 3:
I used an orange pom and some Halloween ribbon to decorate the bow. I actually did not plan for the blow to look like this but the pom was smaller than I thought so I had to use something to fill in the space.  Not too shabby, eh?

Step 4:
For each one, I cut two 2" wide strips of black felt, glued one end of each strip to the cover,  then used Velcro to attach them to the chairs.  Note: I cut the strips down once I measured the covers up against the chairs and THEN adhered the Velcro to the strips.  It's important to do this because you'll need to know where to cut down the strips if need be.


And there you have it boys and girls.  Two Halloween chair covers (decor rather) for your kids chairs at the dinner table.

I know that the Hello Kitty cover isn't very Halloweenie so maybe next year I'll get more creative with HK.  I almost put fangs on her but it just didn't look right.  I did, however, plan to put fangs on the bat for my boy and I completely forgot.  I remembered once the covers were on the chairs.  My boy said that he liked it with the smile and not to worry about the fangs.  This is coming from the same boy that said my Frankenstein treat bags weren't scary enough and asked me to change them up a bit.  Go figure!

I'm a party girl and am linking up with:
Creations by Kara * Verry Merry Vintage Style

Snack Station {Halloween}

Hello, happy Friday and happy kickoff to Halloween weekend!  I know, I know I’m rarely on here but I finally got a light under my butt to p...